Build A News App Using React Native Expo and NewsAPI
Android development and IOS development projects for beginners and intermediates
Bitcoin, Dogecoin, Etherium, and many other cryptocurrencies are the main buzzing terms from the last 2 years. Everyone wants to invest in them because of their higher return. But before investing in any coin you have to look at the market sentiments, news, and many other things. Many social media platforms provide crypto-related news. But you can’t rely on them, right? Because you invested your own money at your own risk. So, It’s better to keep control in your own hand.
So, let’s make a cryptocurrency news app using react native expo, where you can get all the crypto coin-related news from a valid source. Take a cup of coffee and let’s begin the hack.
If you are looking for a video tutorial then it’s here:
Setup and Installation
Attention all developers seeking to make social connections and establish themselves while earning passive income — look no further! I highly recommend ‘From Code to Connections’, a book that will guide you through the process. Don’t miss out, grab your copy now on Amazon worldwide or Amazon India! You can also go for Gumroad
- Open a directory in your system and start an expo project using the command:
expo init NewsApp- Select the blank Javascript template and continue to the Javascript dependencies downloading.
- Move to the new directory (“NewsApp”)
- Install the following dependencies:
npm install axios
npm install react-native-paper- Now, make your account on News API. From this website, you will get your API key. We are going to use this API key to fetch the news of our interest
We are done with the project setup and installation. Let’s quickly jump to the code part.
Code of News App in React Native Expo
Make two folders in the parent directory. One is a component and the other is screens. Inside the component folder, we are going to make the header.
components/AppBar.js
import * as React from 'react';
import { Appbar } from 'react-native-paper';const Header = () => {return (
    <Appbar.Header style={{marginTop:40, backgroundColor:'blue'}}>

      <Appbar.Content title="Home" />

    </Appbar.Header>
  );
};export default Header;
well, it’s a simple Header. I used react native paper for the header. You can use other javascript libraries too like, native base or others.
screens/index.js
We are going to use a class-based component for the screen. But first, let’s import all the required components.
import React, { Component } from 'react'
import { View, Text, Image, ScrollView, Linking } from 'react-native'
import axios from 'axios'
import { Card, Title, Paragraph } from 'react-native-paper'import Header from '../../components/AppBar'
Now, inside the class-based component, add the following code.
state = {
        articles: [],
        isLoading: true,
        errors: null
    };
Define the states.
getArticles() {
        axios
          .get(
            "https://newsapi.org/v2/everything?q=Cryptocurrency&from=2021-09-08&sortBy=popularity&apiKey=API_KEY"
          )
          .then(response =>
            response.data.articles.map(article => ({
              date: `${article.publishedAt}`,
              title: `${article.title}`,
              url: `${article.url}`,
              description: `${article.description}`,
              urlToImage: `${article.urlToImage}`,
            }))
          )
          .then(articles => {
            this.setState({
              articles,
              isLoading: false
            });
          })
          .catch(error => this.setState({ error, isLoading: false }));
    }componentDidMount() {
        this.getArticles();
    }
Now fetch the news using Axios. But first, update your API key. Here I sent the query as Cryptocurrency, if you want cricket-related news then you can change it to cricket. The news API will fetch you cricket news.
After that, specify our requirements. In this case, we will fetch the date, title, URL, description, and urlToImage.
After the successful fetch, change the state. Now our empty array state will be updated with the data we fetched. After the successful fetch, loading will be set to false.
render(){const{ isLoading, articles } = this.state;return (<View><Header/><ScrollView>{!isLoading ? (articles.map(article => {const {date, title, url, description, urlToImage} = article;return(<Card key={url} style={{marginTop:10, borderColor:'black', borderRadius:5, borderBottomWidth:1}}onPress={()=>{Linking.openURL(`${url}`)}}><View style={{flexDirection:'row',}}>{/* Text */}<View style={{justifyContent:'space-around', flex:2/3, margin:10}}><Title>{title}</Title></View>{/* Image */}<View style={{flex:1/3, margin:10}}><Image style={{width:120, height:120}} source={{uri: urlToImage}} /></View></View><View style={{margin:10}}><Paragraph>{description}</Paragraph><Text>Published At: {date}</Text></View></Card>);})) : (<Text style={{justifyContent:'center', alignItems:'center'}}>Loading...</Text>)}</ScrollView></View>)}
Don’t worry about the above code, you will get full Github code access.
Inside a card, we will render our data. The card is clickable. When you click on a card, your default browser will open an assigned URL.
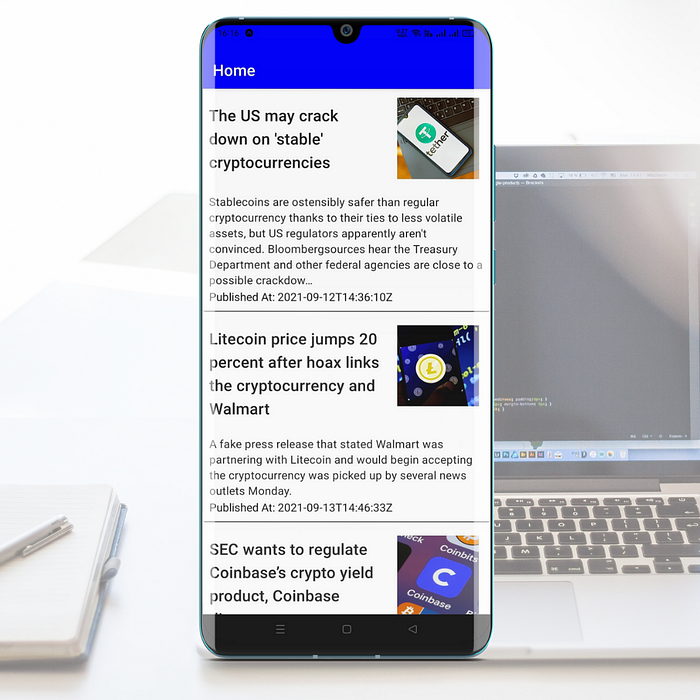
On the mobile screen, you will see, news title, Image, news description, and published time. You can customize the UI part. I know you are a pro designer.
But now, import these screens in App.js
App.js
import React from 'react';
import { StyleSheet, Text, View } from 'react-native';import HomeScreen from './screens/HomeScreen';export default function App() {
  return (
    <View style={styles.container}>
      <HomeScreen/>
    </View>
  );
}const styles = StyleSheet.create({
  container: {
    flex: 1,
    backgroundColor: '#fff',
  },
});
Now, open your command prompt window or terminal window and run this project using the command:
npm startScan the QR code with your mobile device. You can scan with both Android and IOS devices, as this project will work fine in both.
After the successful javascript dependencies are built. You will see something like this on your mobile device screen.
I know UI is not that much cooler. You can customize it.
The Github code of the weather app is here.
That’s it.
Thank you for reading. If this article is informative then make sure to follow and share it with your community and follow for more.
Hello, My Name is Rohit Kumar Thakur. I am open to freelancing. I build react native projects and currently working on Python Django. Feel free to contact me (freelance.rohit7@gmail.com)
More content at plainenglish.io. Sign up for our free weekly newsletter. Get exclusive access to writing opportunities and advice in our community Discord.