Convert Text to Speech using Python and gTTS
Python project for beginners. Use of Google text to speech.
When we start learning Python, then after some point of time, we all go for projects. And it’s a good habit because doing projects is necessary if you want to master any programming language. The same goes for the Python programming language too. As a beginner, you have to do some projects.
Text to speech conversion using Python is a beginner-level project or you can say it is intermediate level too. In this project, we will convert our input text into speech in 25 lines of Python code. So, let’s start this mini-project with a cup of coffee.
If you are looking for a video tutorial then it's here.
Text to Speech Conversion Code with Explanation
Attention all developers seeking to make social connections and establish themselves while earning passive income — look no further! I highly recommend ‘From Code to Connections’, a book that will guide you through the process. Don’t miss out, grab your copy now on Amazon worldwide or Amazon India! You can also go for Gumroad
I recommend you to make this project in a virtual environment. It’s a good habit to build a Python-based project in a virtual environment.
Project Setup
If you don’t have a virtual environment installed in your system then install it first. Then open the terminal window or command prompt window in your preferred directory. And type the command as shown below.
virtualenv -p python3.8 textToSpeechNavigate to the directory “textToSpeech” and activate the virtual environment. The code for it is different for different OS. If you are using Linux then you can type the “source bin/activate” command in your terminal window to activate the virtual environment.
After you activate the virtual environment then install the following Python library package.
pip install tk  #make sure tkinter installed in your system
pip install playsound
pip install gtts
Make a Python file in the virtual environment and name it as per your choice. I named it tts.py
That’s it. Our project setup is ready now. Let’s jump on to the code part.
Code Part
- Import the Libraries
from gtts import gTTS #google text to speech
from playsound import playsound
from tkinter import *- Initialize the window
root = Tk()
root.geometry('600x600')
root.title('BUG NINZA')
root.config(bg='white')
We need some GUI, right? And Tkinter will take care of it. we just have to assign value as per our choice. In the above code, I just assign a window screen with a dimension of 600*600. The background color of the window will be white with the title “BUG NINZA”. It’s pretty much self-explanatory.
- Set Labels
Label(root, text = 'TEXT TO SPEECH' , font='arial 20 bold' , bg ='white smoke').pack()Label(root, text ='Enter Text', font ='arial 15 bold', bg ='white smoke').place(x=20,y=60)
The above code is also for the GUI. We set the format of text and take care of its position on the screen.
- Entry field
#text variable
Msg = StringVar()#Entry
input_field = Entry(root, textvariable=Msg, width = '60')
input_field.place(x=20, y=100)
We are using the input field from tkinter Python library and it requires text variable as a parameter. That’s why we make a variable for it.
- Text to speech function
def tts():
    Message = input_field.get()
    speech = gTTS(text = Message)
    speech.save('Ninza.mp3')
    playsound('Ninza.mp3')def Exit():
    root.destroy()def Reset():
    Msg.set("")
In the tts function, we get the message from the input field variable. You can play as well as save the audio of the text in your local storage. We are using google text to speech library for the conversion of text into speech.
Next, the rest two functions are to exit the window and reset the input space.
- Buttons to command
Button(root, text = "PLAY" , font = 'arial 15 bold', command = tts, width =4).place(x=25, y=140)
Button(root,text = 'EXIT',font = 'arial 15 bold' , command = Exit, bg = 'Red').place(x=100,y=140)
Button(root, text = 'RESET', font='arial 15 bold', command = Reset).place(x=175 , y =140)
There are three buttons. Play button, exit button, and a reset button.
- Infinite loop to run the program
root.mainloop()Well, that’s it, now runs the Python program in the virtual environment, using the command: python tts.py
You will see something like this on-screen.
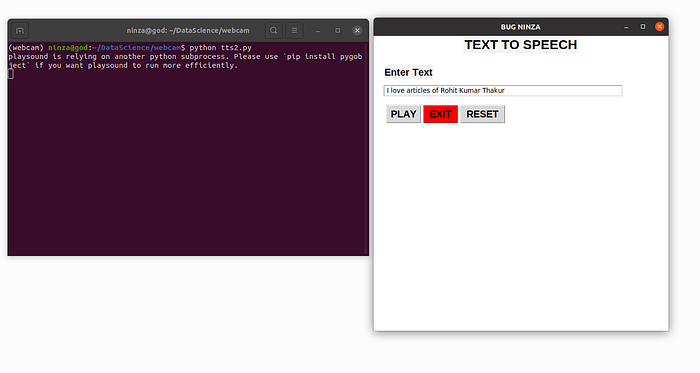
Enter your name in the input area and click on the play button. You will hear it properly. Now check the directory in which you made this Python file. You will see one new mp3 file(Ninza,mp3) there. This is the audio file of the text you played recently. You can reset as well as exit. It works totally fine.
BINGO. You have completed one Python project. Clap for yourself. If you lost somewhere in the code then here is the full code of this project.
#import the librariesfrom gtts import gTTS
from playsound import playsound
from tkinter import *#initialized windowroot = Tk()
root.geometry('600x600')
root.title('BUG NINZA')
root.config(bg='white')#Labels
Label(root, text = 'TEXT TO SPEECH' , font='arial 20 bold' , bg ='white smoke').pack()Label(root, text ='Enter Text', font ='arial 15 bold', bg ='white smoke').place(x=20,y=60)# text variable
Msg = StringVar()#Entry
input_field = Entry(root, textvariable=Msg, width = '60')
input_field.place(x=20, y=100)#tts functiondef tts():
    Message = input_field.get()
    speech = gTTS(text = Message)
    speech.save('Ninza.mp3')
    playsound('Ninza.mp3')def Exit():
    root.destroy()def Reset():
    Msg.set("")#Buttons
Button(root, text = "PLAY" , font = 'arial 15 bold', command = tts, width =4).place(x=25, y=140)
Button(root,text = 'EXIT',font = 'arial 15 bold' , command = Exit, bg = 'Red').place(x=100,y=140)
Button(root, text = 'RESET', font='arial 15 bold', command = Reset).place(x=175 , y =140)#infinite loop to run program
root.mainloop()
Well, That’s it.
If this article sounds informative then make sure to follow and share it with your geek community.
Here are more Python projects for practice!
Make a Calculator using Python and Tkinter
YouTube Video Downloader using Python and Tkinter
Capture and Process Video Footage from a Webcam using OpenCV Python
Rock, Paper, and Scissors Game using Python Programming
Random Password Generator using Python Programming
Happy coding..!!
Hello, My Name is Rohit Kumar Thakur. I am open to freelancing. I build react native projects and currently working on Python Django. Feel free to contact me (freelance.rohit7@gmail.com)